Collection Schema
Introduction
In some aspects DEKER™ is similar to other database management systems. It has collections which are equivalent to tables in relational databases or collections in MongoDB.
Collection stores one of two flavors of arrays supported by DEKER™. We would look into difference between them later in this tutorial, but for now it is important to understand that array is defined by the schema associated with the collection where it is stored.
Collection schema consists from several components:
Dimensions schema defining number of array dimensions, their size, step and labels or scales that simplify addressing particular dimension
Primary attributes schema defines mandatory attributes that constitute unique identifier of particular array that could be used to locate it inside the collection
Custom attributes schema defines optional attributes that could be stored along the particular array but could not be used to locate it
Attention
Dimensions and both primary and custom attributes schemas are immutable. Once you have created collection, you will only be able manage arrays in it and modify their custom attributes value.
Understanding Array Flavors
Two flavor of arrays supported by DEKER™ are Array and VArray. Those objects represent
core concept of DEKER™ storage. Hereafter we will describe their structure, differences and
commonalities and give overview of when either of them should be used.
Array
Array is a wrapper over physical file containing actual array data.
Each array consists of individual cells  containing singular data values.
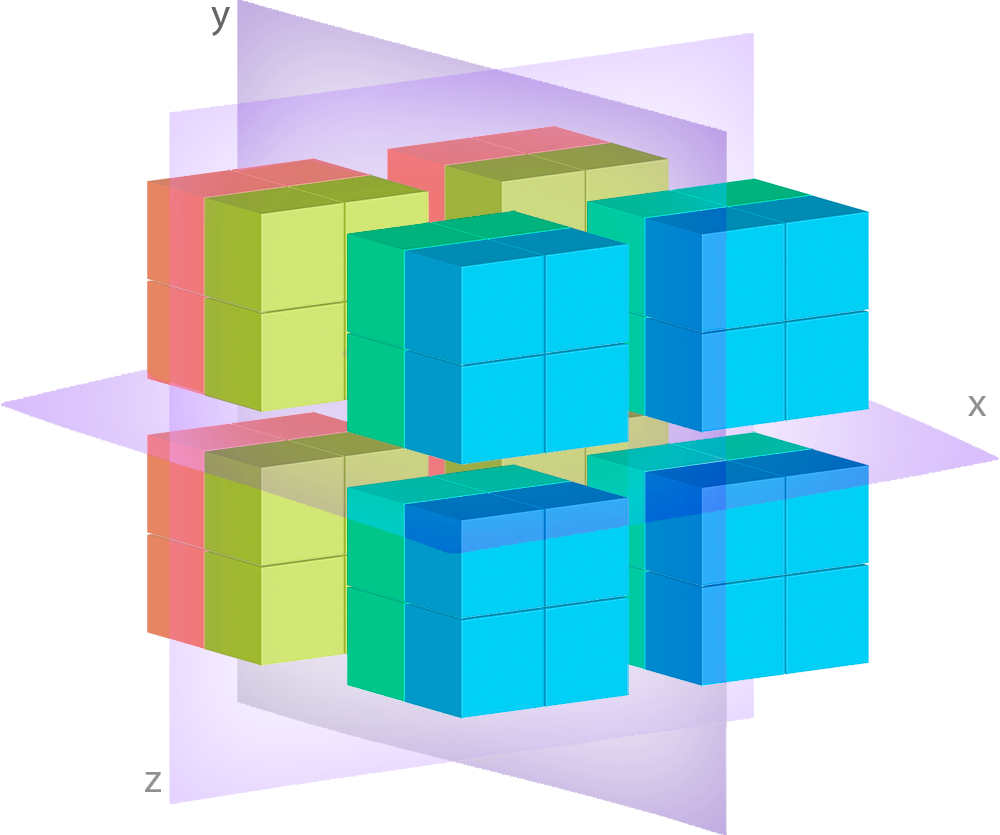
Let’s consider a simple 3D array containing current weather data bound to some grid:


Let’s assume that X and Y axes represent geographical grid, and Z axis represents
layers with particular weather characteristic values, as shown in the legend.
In the illustration above single Array has 4 cells in each dimension, in other words its
shape is (4, 4, 4).
DEKER™ will store each Array data in a separate file, and when we retrieve this Array
object from Collection and access its data, all operations will affect this file only.
VArray
From the developer point of view VArray is almost indistinguishable from Array.
Like Array it has dimensions, primary and custom attributes, it is stored in collection
and all operations that could be performed on Array could be performed on VArray as well.
But there is a significant difference in its implementation.
Imagine that instead of data bound to 4x4 grid you need to store a high-resolution image of something really huge like whole Earth surface satellite image. Let’s say that size of such image would be 300000x200000 px. If stored in single file it will produce large filesystem objects that will impose limitations on concurrent read-write access thus impending storage scalability.
To optimize this type of data storage, DEKER™ uses tiling, i.e. it splits large VArray objects
into series of smaller Array objects and transparently join them into for user access as
virtual array. It probably would still be impossible to access this huge array as a whole, but it
enables efficient access to digestible parts of it piece by piece.
VArray is a wrapper over such a set of files. In the image above you can see how it is split
into separate tiles (Array objects) with regular grid.
If Collection is defined to contain VArray objects, you don’t have to worry about tiling,
DEKER™ would transparently manage this for you under the hood.
When some slice of data is queried from the VArray, it automatically calculates which files
need to be opened to retrieve it and what part of requested slice data bounds belong to each of
each file.
For example, let’s consider VArray with dimensions ['X', 'Y', 'Z'] and shape (4, 4, 4),
with its zero-index at the front-left-bottom corner.

Let’s query the following slice of it: [1:3, :, :]

Here you can see, that all 4 tile files will be affected, but only the highlighted pieces of them will be actually read or written. All different files reads or writes could be done in parallel. In case you are retrieving data, DEKER™ will transparently combine each read piece into subset with requested shape and return it to you. If you use these bounds to write data, DEKER™ will automatically split the slice you have provided into pieces and write them in parallel to corresponding files.
Dimensions Order
It is important to remember that all array dimensions have strict order which is significant for your data storage design.
Let’s have a look at array image:
As usual, every array has just one entrance point. You cannot get inner data without passing through outer layers, but there is only one gate for each layer.
When you decide on the dimensions positioning, you shall understand and keep in mind your usual querying patterns. Correct positioning will make the querying faster, a wrong one will slow it.
Assume, that our gates are always at the front face, as shown by the arrows, and the dimensions
are arranged as ['X', 'Y', 'Z']:
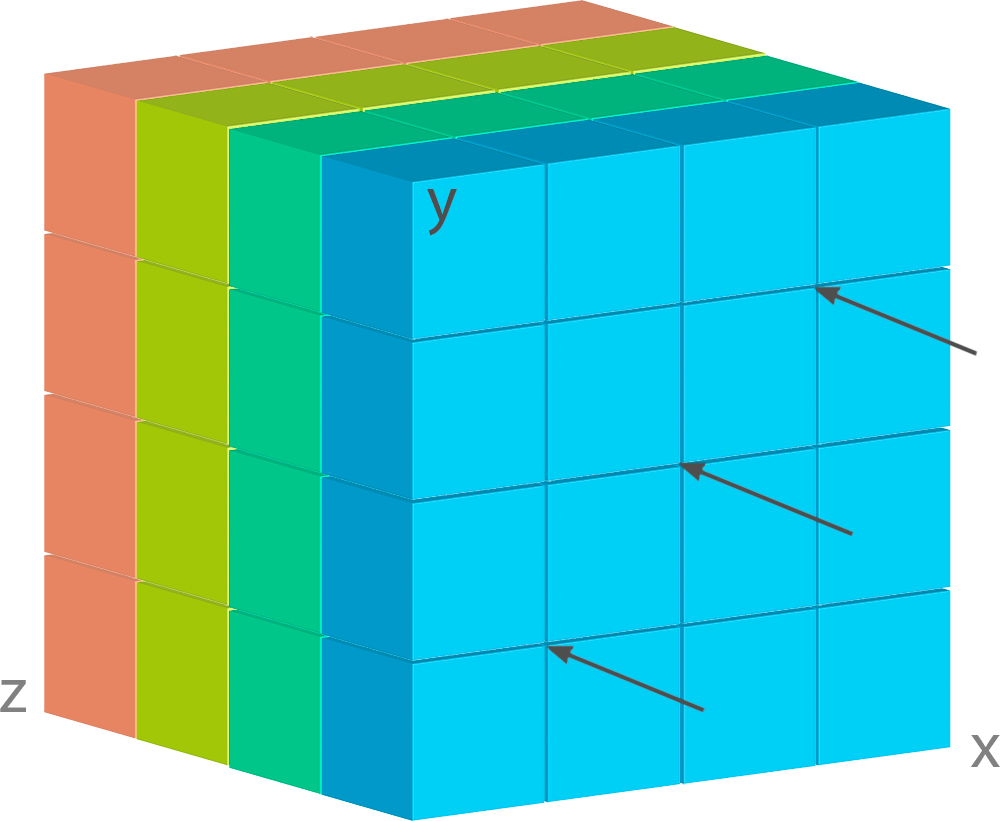
It means that when we query our data, in the first place we capture X dimension, then Y
dimension and only after that we can get to our weather data. As long as weather layers are under
the geo grid, such a sequence perfectly fits for querying a pack of weather data for some
geo points.
But what if we place these dimensions in a different manner?
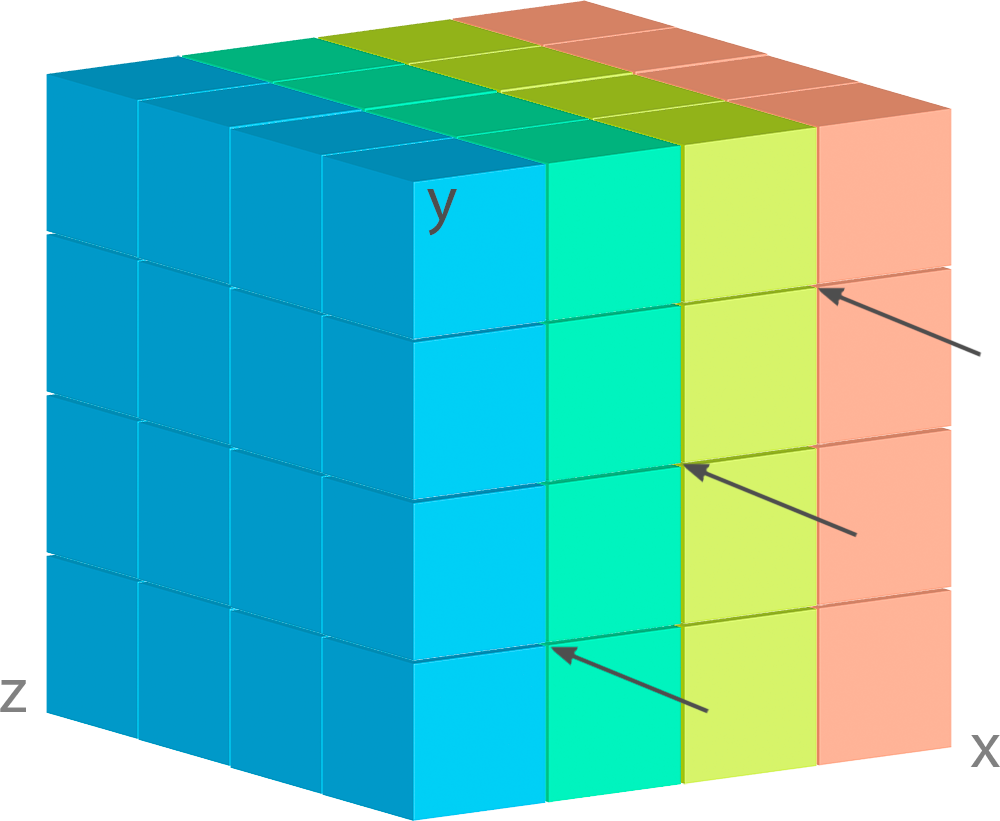
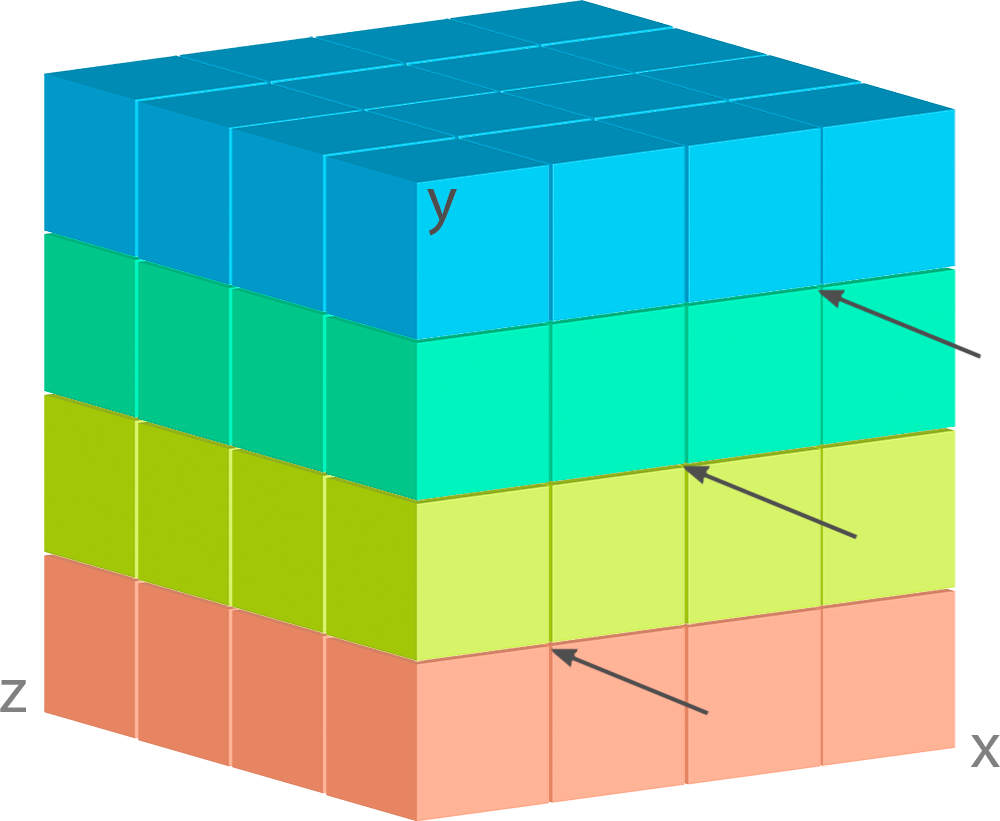
Now each geo point contains only one sort of information. Moreover, you can place these dimensions
in such a way, when weather layers will become the first dimension, for example like
['Z', 'Y', 'X'].
It entails that each its cell contains all the geo-grid, and the queries become much slower.
So, before positioning the dimensions, you’d better decide how you are going to query your data and what order is the most suitable for such queries.
Dimensions Schemas
Each dimension shall have its size - a precise non-zero positive quantity of its cells with a
constant scalar step 1.
We believe that every piece of data shall be described, otherwise it is just a number or a
meaningless symbol. Each dimension, regardless of its type, shall have at least a unique name.
Note
The final sequence of your dimensions schemas represents the exact shape of the future
Array or VArray.
Dimension Schema
Here is an example of DimensionSchema declaration:
from deker import DimensionSchema

dimensions = [
    DimensionSchema(name="height", size=255),
    DimensionSchema(name="width", size=512),
]
Even if you need an array with only one dimension, it shall still be defined as a list (or a tuple) of dimension schemas:
dimension = (
    DimensionSchema(name="total_daily_income", size=366),
)
Note
DimensionSchema is kept in the Collection metadata and converted into Dimension
object for each Array or VArray of such Collection.
All right, now we have a list of two dimensions, named "height" and "width". They have some
size, but what are the units? Is there any regular scale for their values? Definitely, there should
be.
Scale
If a dimension has a real regular scale, we may indicate it:
from deker import DimensionSchema, Scale

dimensions = [
    DimensionSchema(
        name="height",
        size=255,
        scale=Scale(start_value=0.0, step=0.01, name="meters")
    ),
    DimensionSchema(
        name="width",
        size=512,
        scale={"start_value": 1.0, "step": 0.5}
    ),
]
As you can see, regular scale can be defined either with Python dict or with DEKER™ Scale
named tuple. The keyword name is optional. Scale values shall be always defined as floats.
The parameters step and start_value may be negative as well. For example, era5 weather
model has a geo grid shaped (ys=721, xs=1440) with step 0.25 degrees per cell. The
zero-point of the map is north-west or left-upper corner. In other words era5 grid point
(0, 0) is set to coordinates (lat=90.0, lon=-180.0).
Here is an example of how this grid can be bound to real geographical coordinates in DEKER™:
dimensions = [
    DimensionSchema(
        name="y",
        size=721,
        scale=Scale(start_value=90.0, step=-0.25, name="lat")
    ),
    DimensionSchema(
        name="x",
        size=1440,
        scale={"start_value": -180.0, "step": 0.25, "name": "lon"}
    ),
]
Now you can be sure that dimensions[0][0], dimensions[1][0] are bound to
lat=90.0, lon=-180.0 and dimensions[0][-1], dimensions[1][-1] are bound to
lat=-90.0, lon=179.75 and lat=0.0, lon=0.0 can be found at
dimensions[0][360], dimensions[1][720].
Labels
If a dimension has no real regular scale, but there is still a certain logic in its values order,
we may use labels to describe it:
dimensions = [
    DimensionSchema(
        name="weather_layers",
        size=4,
        labels=["temperature", "pressure", "wind_speed", "humidity"],
    ),
]
You can provide not only a list of strings, but a list (or a tuple) of floats as well.
Both labels and scale provide a mapping of some reasonable information onto your data
cells. If labels is always a full sequence kept in metadata and in memory, scale is
calculated dynamically.
As for the example with labels, we can definitely state that calling index [0] will provide
temperature data, and index [2] will give us wind speed and nothing else. The same works for
scaled dimensions. For example, height index [1] will keep data relative to height
0.01 meters and index [-1] - to height 2.54 meters.
If you set some scale or labels for your dimensions, it will allow you to slice these
dimensions not only with integer, but also with float and string (we will dive into it
in the section about fancy slicing).
Time Dimension Schema
If you need to describe some time series you shall use TimeDimensionSchema.
Note
TimeDimensionSchema is kept in the Collection metadata and converted into
TimeDimension object for each Array or VArray of such Collection.
TimeDimensionSchema is an object, which is completely described by default, so it needs no
additional description. Thus, it allows you to slice TimeDimension with datetime objects
or float timestamps or even string (ISO 8601 formatted).
Like DimensionSchema it has name and size, but also it has its special arguments.
Start Value
Consider the following TimeDimensionSchema:
from datetime import datetime, timedelta, timezone
from deker import TimeDimensionSchema

dimensions = [
    TimeDimensionSchema(
        name="dt",
        size=8760,
        start_value=datetime(2023, 1, 1, tzinfo=timezone.utc),
        step=timedelta(hours=1)
    ),
]
It covers all the hours in the year 2023 starting from 2023-01-01 00:00 to 2023-12-31 23:00 (inclusively).
Direct setting of the start_value parameter will make this date and time a common
start point for all the Array or VArray. Sometimes it makes sense, but usually we want
to distinguish our data by individual time. In this case, it should be defined as follows:
dimensions = [
    TimeDimensionSchema(
        name="dt",
        size=8760,
        start_value="$some_attribute_name",
        step=timedelta(hours=1)
    ),
]
A bit later you will get acquainted with AttributesSchema, but for now it is important to note,
that providing start_value schema parameter with an attribute name starting with $ will
let you set an individual start point for each new Array or VArray at its creation.
Attention
For start_value you can pass a datetime value with any timezone (e.g. your local timezone),
but you should remember that DEKER™ converts and stores it in the UTC timezone.
Before querying some data from TimeDimension, you should convert your local time to UTC to
be sure that you get a pack of correct data. You can do it with get_utc() function from
deker_tools.time module.
Step
Unlike ordinary dimensions TimeDimensionSchema shall be provided with step value, which
shall be described as a datetime.timedelta object. You may certainly set any scale for it,
starting with microseconds, ending with weeks, it will become a mapping for the dimension scalar
indexes onto a certain datetime, which will let you slice it in a fancy way.
Note
Why are integers inapplicable to timestamps and to scale and labels values?
Integers are reserved for native Python indexing.
If your timestamp is an integer - convert it to float.
If your scale start_value and step are integers - define them as corresponding floats.
If your labels are integers for some reason - convert them to strings or floats.
Attributes Schema
All databases provide some additional obligatory and/or optional information concerning data. For example, in SQL there are primary keys which indicate that data cannot be inserted without passing them.
For this purpose DEKER™ provides primary and custom attributes which shall be defined as a
list (or a tuple) of AttributeSchema:
from deker import AttributeSchema

attributes = [
    AttributeSchema(
        name="some_primary_attribute",
        dtype=int,
        primary=True
    ),
    AttributeSchema(
        name="some_custom_attribute",
        dtype=str,
        primary=False
    ),
]
Here we defined a pack of attributes, which will be applied to each Array or VArray in our
Collection. Both of them have a name and a dtype of the values you are going to pass
later.
Regardless their primary flag value, their names must be unique. Valid dtypes are the
following:
int
float
complex
str
tuple
datetime.datetime
The last point is that one of the attributes is primary and another is custom. What does it
mean?
Primary Attributes
Note
Attribute for TimeDimension start_value indication shall be dtyped datetime.datetime
and may be primary.
Attention
It is highly recommended to define at least one primary attribute in every schema.
Primary attributes are a strictly ordered sequence. They are used for Array or VArray
filtering. When DEKER™ is building its file system, it creates symlinks for main data files using
primary attributes in the symlink path. If you need to get a certain Array or VArray from a
Collection, you have two options how to do it:
pass its
id,or indicate all its primary attributes’ values.
Attention
Values for all the primary attributes must be passed at every Array or VArray
creation.
Custom Attributes
Note
Attribute for TimeDimension start_value indication shall be dtyped datetime.datetime
and may be custom as well.
No filtering by custom attributes is available at the moment. They just provide some optional information about your data. You can put there anything, that is not very necessary, but may be helpful for the data managing.
Custom attributes are the only mutable objects of the schema. It does not mean that you can change
the schema, add new attributes or remove old ones. It means that you can change their values (with
respect to the specified dtype) if needed. You can also set their values to None, except
the attributes dtyped datetime.datetime.
Attention
Values for custom attributes are optional for passing at every Array or VArray
creation.
If nothing is passed for some or all of them, they are set to None.
This rule concerns all the custom attributes except custom attributes dtyped
datetime.datetime. Values for custom attributes dtyped datetime.datetime must be
passed at every Array or VArray creation and cannot be set to None.
Note
Defining AttributeSchemas is optional: you may not set any primary or custom attribute
(except attribute for TimeDimension.start_value indication).
Array and VArray Schemas
Since you are now well informed about the dimensions and attributes, we are ready to move to the
arrays’ schemas. Both ArraySchema and VArraySchema must be provided with a list of
dimensions schemas and dtype. You may optionally pass a list of attributes schemas and
fill_value to both of them.
Data Type
DEKER™ has a strong data typing. All the values of all the Array or VArray objects in one
Collection shall be of the same data type. DEKER™ accepts numeric data of the following Python
and NumPy data types:
Integers Type
Bits
Bytes
Range
Python
int64
8
-9223372036854775808 … 9223372036854775807
numpy.int8
numpy.byte8
1
-128 … 127
numpy.int16
numpy.short16
2
-32768 … 32767
numpy.int32
numpy.intc32
4
-2147483648 … 2147483647
numpy.int64
numpy.longlong
numpy.intp
numpy.int_64
8
-9223372036854775808 … 9223372036854775807
Unsigned Integers Type
Bits
Bytes
Range
numpy.uint8
numpy.ubyte8
1
0 … 255
numpy.uint16
numpy.ushort16
2
0 … 65535
numpy.uint32
numpy.uintc32
4
0 … 4294967295
numpy.uint
numpy.uint64
numpy.uintp
numpy.ulonglong64
8
0 … 18446744073709551615
Floating points Type
Bits
Bytes
Range
Python
float64
8
-1.7976931348623157*10^308 …
1.7976931348623157*10^308
numpy.float16
numpy.cfloat
numpy.cdouble16
2
-65500.0 … 65500.0
numpy.float32
numpy.clongfloat32
4
-3.4028235*10^38 … 3.4028235*10^38
numpy.float64
numpy.double64
8
-1.7976931348623157*10^308 …
1.7976931348623157*10^308
numpy.float128
numpy.longfloat
numpy.longdouble128
16
-1.189731495357231765*10^4932 …
1.189731495357231765*10^4932
Complex Type
Bits
Bytes
Range
Python
complex128
16
-1.189731495357231765*10^4932-1.189731495357231765*10^4932j …
1.189731495357231765*10^4932+1.189731495357231765*10^4932j
numpy.complex64
numpy.singlecomplex64
8
-1.7976931348623157*10^308-1.7976931348623157*10^308j …
1.7976931348623157*10^308+1.7976931348623157*10^308j
numpy.complex128
numpy.complex_128
16
-1.189731495357231765*10^4932-1.189731495357231765*10^4932j …
1.189731495357231765*10^4932+1.189731495357231765*10^4932j
numpy.complex256
numpy.longcomplex256
32
even more
Python int, float and complex are correspondingly converted to numpy.int64,
numpy.float64 and numpy.complex128.
What influence is caused by a chosen data type?
Insofar as any data type has its own size it influences the memory: virtual and physical. Thus, we can predict how much memory and space we will need for an array with this or that shape and dtype. Let’s say, we have an array with shape (10, 10, 10):
np.int32 = 32 bits / 8 bits = 4 bytes
shape (10, 10, 10) * 4 b = 10 * 10 * 10 * 4 = 4000 b / 1024 b = 3.9 Kb

np.float64 = 64 bits / 8 bits = 8 bytes
shape (10, 10, 10) * 8 b = 10 * 10 * 10 * 8 = 8000 b / 1024 b = 7.8 Kb

np.complex128  = 128 bits / 8 bits = 16 bytes
shape (10, 10, 10) * 16 b = 10 * 10 * 10 * 16 = 16000 b / 1024 b = 15.6 Kb
Also, it influences minimal and maximal values of your data.
For example,
the range of numpy.int8 is insufficient for displaying Kelvin zero
in Celsius integer degrees, as the limit is -128 and 0°K ~= -273.15°C.
And it influences the fill value.
Fill Value
Sometimes it happens that we have no values for some cells or we want to clear our data out in full
or in some parts. Unfortunately, NumPy does not allow you to set python None to such cells.
That’s why we need something that will fill them in.
Rules are the following:
fill_valueshall not be significant for your data.fill_valueis optional - you may not provide it. In this case DEKER™ will choose it automatically basing on the provideddtype. Forintegerandunsigned integerdata types it will be the lowest value for the correspondent data type bit capacity. For example, it will be-128fornumpy.int8. Forfloatandcomplexdata types it will benumpy.nanas this type is alsofloating.If you would like to set it manually,
fill_valueshall be of the same data type, that was passed to thedtypeparameter. If all the values of the correspondentdtypeare significant for you, you shall choose a data type of a greater bit capacity. For example, if all the values in the range[-128; 128]are valid for your dataset, you’d better choosenumpy.int16instead ofnumpy.int8and set-129asfill_valueor let DEKER™ to set it automatically. The other workaround is to choose any floating data type, e.g.numpy.float16, and havenumpy.nanas afill_value.
Now, let’s create once again some simple dimensions and attributes for both types of schemas:
from deker import DimensionSchema, AttributeSchema

dimensions = [
    DimensionSchema(name="y", size=100),
    DimensionSchema(name="x", size=200),
]

attributes = [
    AttributeSchema(name="attr", dtype=str, primary=False)
]
Array Schema
Let’s define schema for Collection of Array:
from deker import ArraySchema

array_schema = ArraySchema(
    dimensions=dimensions,
    attributes=attributes,
    dtype=float,  # will be converted and saved as numpy.float64
    # fill_value is not passed - will be numpy.nan
)
VArray Schema
And schema of Collection of VArray:
from deker import VArraySchema

varray_schema = VArraySchema(
    dimensions=dimensions,
    dtype=np.int64,
    fill_value=-99999,
    vgrid=(50, 20),
    attributes=None  # attributes are optional
)
VArray Grid
Note
arrays_shape parameter added in v1.1.0
Perhaps it is one of the most obscure issues. VArray shall be split into files, but it cannot
decide itself how it shall be done. It’s up to you, how you are going to split your data.
There are two ways: vgrid and arrays_shape parameters. You can choose any of them,
but not both. Any of these parameters shall be defined as a tuple of integers which quantity
shall be exactly similar to the quantity of the dimensions and its values shall divide VArray
shape without remainders.
Our schema has two dimensions with sizes 100 and 200 correspondingly, what tells us
that the VArray shape will be (100, 200). We shall split it either by vgrid or
with arrays_shape.
vgrid
Let’s set vgrid as (50, 20).
from deker import VArraySchema

varray_schema = VArraySchema(
    dimensions=dimensions,
    dtype=np.int64,
    fill_value=-99999,
    vgrid=(50, 20)
    # attributes are not passed as they are optional
)
What shall happen? No magic, just a simple math:
(100, 200) / (50, 20) = (2.0, 10.0)
(2, 10) - that will be the shape of all the Array, produced by the VArray, or the
arrays_shape.
If we do not want to divide any dimension into pieces and want to keep it in full size in all the
Array, we shall pass 1 in vgrid for that dimension:
(100, 200) / (1, 20) = (100.0, 10.0)
Thus, the first dimension will retain its initial size for all the arrays, and their shape will be
(100, 10).
If the vgrid setting is correct, it will be saved to the collection metadata and applied every
time to all new VArrays.
arrays_shape
(added in v1.1.0)
Sometimes it is easier to decide on the shape of the final Arrays than on a vgrid.
In this case you can use arrays_shape parameter.
from deker import VArraySchema

varray_schema = VArraySchema(
    dimensions=dimensions,
    dtype=np.int64,
    fill_value=-99999,
    arrays_shape=(2, 10)
    # attributes are not passed as they are optional
)
By providing this parameter you manually set the shape of each inner Array to the
passed value and produce the vgrid of your VArrays.
The VArray's shape will be divided by this setting:
(100, 200) / (2, 10) = (50.0, 20.0)
(50, 20) - that will be the vgrid of the VArray.
If you use arrays_shape for defining a VArraySchema, not the passed setting, but the
calculated vgrid will be saved to the collection metadata. On each collection
invocation arrays_shape is calculated from the vgrid value restored from the metadata.
OK! Now we are finally ready to create our first database and we need Client.
Creating Collection
Client is responsible for creating connections and its internal context.
As far as DEKER™ is a file-based database, you need to provide some path to the storage, where your collections will be kept.
URI
There is a universal way to provide paths and connection options: an URI.
The scheme of URI string for embedded DEKER™ databases, stored on your local drive, is file://.
It shall be followed by a path to the directory where the storage will be located. If this
directory (or even full path to it) does not exist, DEKER™ will create it at Client
initialization.
Note
Relative paths are also applicable, but it is recommended to use absolute paths.
Explicit is better than implicit. Zen of Python:2
In this documentation we will use a reference to a temporary directory /tmp/deker:
uri = "file:///tmp/deker"
Client
Now open the Client for interacting with DEKER™:
from deker import Client

client = Client(uri)
You can use it as a context manager as well:
with Client(uri) as client:
    # some client calls here
Client opens its connections and inner context at its instantiation. If you use context
manager, it will close them automatically on exit. Otherwise the connections and context will
remain opened until you call client.close() directly.
If for some reason you need to open and close Client in different parts of your code, you may
define it only once and reuse it by calling a context manager:
client = Client(uri)
# call client here
client.close()

with client:
    # do more client calls here

with client:
    # and call it here as well
Putting Everything Together
Great! Now let’s assemble everything from the above scope and create an Array collection of
some world-wide weather data:
from datetime import datetime, timedelta

from deker import (
    TimeDimensionSchema,
    DimensionSchema,
    Scale,
    AttributeSchema,
    ArraySchema,
    Client,
    Collection
)

dimensions = [
    TimeDimensionSchema(
        name="day_hours",
        size=24,
        start_value="$dt",
        step=timedelta(hours=1)
    ),
    DimensionSchema(
        name="y",
        size=181,
        scale=Scale(start_value=90.0, step=-1.0, name="lat")
    ),
    DimensionSchema(
        name="x",
        size=360,
        scale=Scale(start_value=-180.0, step=1.0, name="lon")
    ),
    DimensionSchema(
        name="weather",
        size=4,
        labels=["temperature", "humidity", "pressure", "wind_speed"]
    ),
]

attributes = [
    AttributeSchema(name="dt", dtype=datetime, primary=True),
    AttributeSchema(name="tm", dtype=int, primary=False),
]

array_schema = ArraySchema(
    dimensions=dimensions,
    attributes=attributes,
    dtype=float,  # will be converted and saved as numpy.float64
    # fill_value is not passed - will be numpy.nan
)

with Client(uri="file:///tmp/deker") as client:
    collection: Collection = client.create_collection("weather", array_schema)

print(collection)

# Will output:
#
# weather
We did it!
Now there is a new path /tmp/deker/collections/weather on your local drive where DEKER™ will
store the data relative to the Collection named weather. Each Array will contain a pack
of daily 24-hours weather data for each entire latitude and longitude degree: temperature,
humidity, pressure and wind_speed.